Command line arguments
-a –algorithm
The criteria that glue uses to order the images before adding them to the canvas can be tunned. By default the algorithm is square, but in some situations using another ordering like vertical or horizontal could be useful depending on the kind of images you are spriting.
- The square algorithm was inspired by the Binary Tree Bin Packing Algorithm Article by Jake Gordon.
- The vertical one allocates the images vertically aligning them to the left of the sprite.
- The vertical-right one allocates the images vertically aligning them to the right of the sprite.
- The horizontal one allocates the images aligning them to the top of the sprite.
- The horizontal-bottom one allocates the images aligning them to the bottom of the sprite.
- The diagonal one allocates the images diagonally. It was inspired by the Diagonal CSS Sprites Article by Aaron Barker.
$ glue source output --algorithm=[square|vertical|hortizontal|diagonal|vertical-right|horizontal-bottom]
-c –crop
Usually designers add some unnecessary transparent space around the images because it is easier for them to work with a larger canvas. glue can optimize our sprite by croping all the unnecessary transparent spaces that the original images could have.
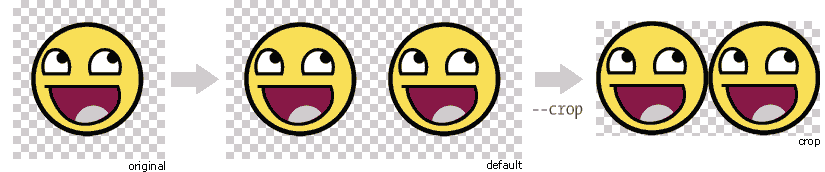
$ glue source output --crop
–caat
Using the --caat option, Glue will generate both a sprite image and a caat metadata file.
$ glue source output --caat
–cachebuster
If you decide to add an expires header to your static resources (and if you haven’t already you really should), you need to worry about cache busting these resources every time you change one of them.
Cache busting is a technique that prevents a browser from reusing a resource that was already downloaded and cached. Cache in general is good, but in some situations could be annoying if it’s duration is too long and we want to update a resource now.
This technique adds a flag to every url that links an external resource (PNG in this case). This flag usually is the last modified time or the hash of the file.
glue can use this technique to automatically add the hash of the PNG file to the CSS url, so as soon as the file change (add/remove an image) the hash will be different and the browser will re-download the image.
$ glue source output --cachebuster
Original css:
.sprite-icons-zoom{ background:url('sprites/icons/icons.png'); top:0; left:0; no-repeat;}
.sprite-icons-wrench_orange{ background:url('sprites/icons/icons.png'); top:0; left:-16; no-repeat;}
...
After –cachebuster:
.sprite-icons-zoom{ background:url('sprites/icons/icons.png?p3c54d'); top:0; left:0; no-repeat;}
.sprite-icons-wrench_orange{ background:url('sprites/icons/icons.png?p3c54d'); top:0; left:-16; no-repeat;}
...
–cachebuster-filename
This option has the same purpose than --cachebuster but insted of using the hash of the PNG as a queryarg it uses it as part of the filename.
$ glue source output --cachebuster-filename
Original css:
.sprite-icons-zoom{ background:url('sprites/icons/icons.png'); top:0; left:0; no-repeat;}
.sprite-icons-wrench_orange{ background:url('sprites/icons/icons.png'); top:0; left:-16; no-repeat;}
...
After –cachebuster:
.sprite-icons-zoom{ background:url('sprites/icons/icons_p3c54d.png'); top:0; left:0; no-repeat;}
.sprite-icons-wrench_orange{ background:url('sprites/icons/icons_p3c54d.png'); top:0; left:-16; no-repeat;}
...
–cachebuster-filename-only-sprites
Unlike --cachebuster-filename, glue will only apply filename cachebusting to the sprite image and not to both the CSS and the sprite image.
$ glue source output --cachebuster-filename-only-sprites
Note
New in version 0.9.2
–cocos2d
Using the --cocos2d option, Glue will generate both a sprite image and a xml metadata file compatible with cocos2d.
$ glue source output --cocos2d
Note
New in version 0.9
Note
The output of this format has not been deeply tested and we are looking for a cocos2d-champion who can sponsor this feature.
–css –img
Usually both CSS and PNG files reside on different folders, e.g. css and img. If you want to choose an individual folder for each type of file you can use the --img=<dir> --css=<dir> options together to customize where the output files will be created.
$ glue source --img=images/compiled --css=css/compiled
–css-template
While using --css you can use your own css template using --css-template=<FILE>.
Note
By default glue will use it’s own internal css template, so this command is not required unless you want to super-customize glue’s css output using your own template. You can find further documentation about how templates work in the templates documentation page.
$ glue source output --css-template=my_template.jinja
–force
By default glue store some metadata inside the generated sprites in order to not rebuild it again if the source images and settings are the same. Glue set two different keys, glue with the version number the sprite was build and hash, generated using the source images data, name and all the relevant sprite settings like padding, margin etc...
In order to avoid this behaviour you can use --force and glue will always build the sprites.
$ glue source output --force
–follow-links
Follow symbolic links.
$ glue source output --follow-links
Note
Be aware that following links can lead to infinite recursion if a link points to a parent directory of itself. glue does not keep track of the directories it visited already.
–html
Using the --html option, Glue will also generate a test html per sprite using all the available CSS classes. This option is only useful for testing purposes. Glue generate the html file in the same directory as the CSS file.
$ glue source output --html
–json
Using the --json option, Glue will generate both a sprite image and a json metadata file.
$ glue source output --json
–json-format
Using the --json-format option you can customize how the generated JSON will look. You can choose between array and hash.
$ glue source output --json --json-format=hash
Example array output:
{"frames": [{"filename": "apple.png", width": 128, "height": 128, ...}, {...}], "meta": {...}}
Example hash output:
{"frames": {"apple.png": {"width": 128, "height": 128, ...}, "orange.png": {...}, "meta": {...}}
-l –less
less is a dynamic stylesheet language that extends CSS with dynamic behaviors.
glue can also create .less files adding the --less option.
This files contain exactly the same CSS code. This option only changes the file format.
$ glue source output --less
–less-template
While using --less you can use your own less template using --less-template=<FILE>.
Note
By default glue will use it’s own internal less template, so this command is not required unless you want to super-customize glue’s less output using your own template. You can find further documentation about how templates work in the templates documentation page.
$ glue source output --less-template=my_template.jinja
Note
New in version 0.9.2
–margin
If you want to spread the images around the sprite but you don’t want to count this space as image width/height (as happens using –padding`), you can use the --margin option followed by the margin you want to add:
$ glue source output --margin=10
$ glue source output --margin='10 20'
$ glue source output --margin='10 20 30 40'
Note
New in version 0.9
–namespace
By default glue adds the namespace sprite to all the generated CSS class names. If you want to use your own namespace you can override the default one using the --namespace option.
$ glue source output --namespace=my-namespace
If you want to completely remove the namespace (both the global and the sprite part) you can use:
$ glue source output --sprite-namespace= --namespace=
–ordering
Before processing the images using the algorithm glue orders the images. The default ordering is maxside but you can configure it using the --ordering option.
$ glue source output --ordering=[maxside|width|height|area|filename]
You can reverse how any of the available algorithms works prepending a -.
$ glue source output --ordering=[-maxside|-width|-height|-area|-filename]
-p –padding
If you want to add the same padding around all images you can use the --padding option:
$ glue source output --padding=10
$ glue source output --padding=10 20
$ glue source output --padding=10 20 30 40
–png8
By using the flag png8 the output image format will be png8 instead of png32.
$ glue source output --png8
Note
This feature is unstable in OSX > 10.7 because a bug in PIL.
–project
As it’s explained at the quickstart page the default behaviour of glue is to handle one unique sprite folder. If you need to generate several sprites for a project, you can use the --project option to handle multiple folders with only one command.
The suggested setup is to create a new folder for every sprite, and add inside all the images you need for each one. glue will create a new sprite for every folder:
images
├── actions
│   ├── add.png
│   └── remove.png
├── borders
│   ├── top_left.png
│   └── top_right.png
└── icons
    ├── comment.png
    ├── new.png
    └── rss.png
$ glue source output --project
–pseudo-class-separator
As it’s explained at the pseudo-classes page using the filename of the source images you can customize the pseudo class related to the images, so if you simply append __hover to the filename glue will add :hover to the CSS class name.
Since glue 0.9 this separator is __ but for previous version it use to be only _. In order to not make glue < 0.9 users rename their images, glue 0.9 introduces this new option so you can customize the separator.
$ glue source output --pseudo-class-separator=_
-r –recursive
Read directories recursively and add all the images to the same sprite.
Example structure:
source
├── actions
│   ├── add.png
│   └── remove.png
├── borders
│   ├── top_left.png
│   └── top_right.png
└── icons
    ├── comment.png
    ├── new.png
    ├── rss.png
    └── blog
        ├── rss.png
        └── atom.png
If you want to create only one sprite image you should use.
$ glue source output --recursive
On the other hand if you want to create three different sprites (one per folder) you can combine --project and --recursive.
$ glue source output --recursive --project
–ratios
Glue can automatically scale down your sprites to automatically fit them into low-dpi devices. Glue assumes that the source images are the biggests you want to serve, then glue will create one sprite for each ratio you set in this command. For more information, read Retina Sprites: Ratios.
$ glue source output --ratios=2,1
$ glue source output --ratios=2,1.5,1
-s –source -o –output
There are two ways to choose which are the source and the output directories. Using the first and the second positional arguments is the traditional way of using glue but in order to standardize how configuration is handled glue 0.9 intruduced these two new options.
$ glue output --source=DIR --output=DIR
–scss
scss/sass is another dynamic stylesheet language that extends CSS with dynamic behaviors.
glue can also create .scss files adding the --scss option.
This files contain exactly the same CSS code. This option only changes the file format.
$ glue source output --scss
Note
New in version 0.9
–scss-template
While using --scss you can use your own less template using --scss-template=<FILE>.
Note
By default glue will use it’s own internal scss template, so this command is not required unless you want to super-customize glue’s scss output using your own template. You can find further documentation about how templates work in the templates documentation page.
$ glue source output --scss-template=my_template.jinja
Note
New in version 0.9.2
–separator
glue by default uses - as separator for the CSS class names. If you want to customize this behaviour you can use --separator to specify your own
one:
$ glue source output --separator=_
If you want to use camelCase instead of a separator, choose camelcase as separator.
$ glue source output --separator=camelcase
–sprite-namespace
By default glue adds the sprite’s name as past of the CSS class namespace. If you want to use your own namespace you can override the default one using the --sprite-namespace option.
$ glue source output --sprite-namespace=custom
As part of the new sprite namespace you can use the key %(sprite)s to refer to the original namespace.
If you want to completely remove the namespace (both the global and the sprite part) you can use:
$ glue source output --sprite-namespace= --namespace=
-u –url
By default glue adds to the PNG file name the relative url between the CSS and the PNG file. If for any reason you need to change this behaviour, you can use url=<your-static-url-to-the-png-file> and glue will replace its suggested one with your url.
$ glue source output --url=http://static.example.com/
–watch
While you are developing a site it could be quite frustrating running Glue once and another every time you change a source image or a filename. --watch will allow you to keep Glue running in the background and it’ll rebuild the sprite every time it detects changes on the source directory.
$ glue source output --watch